


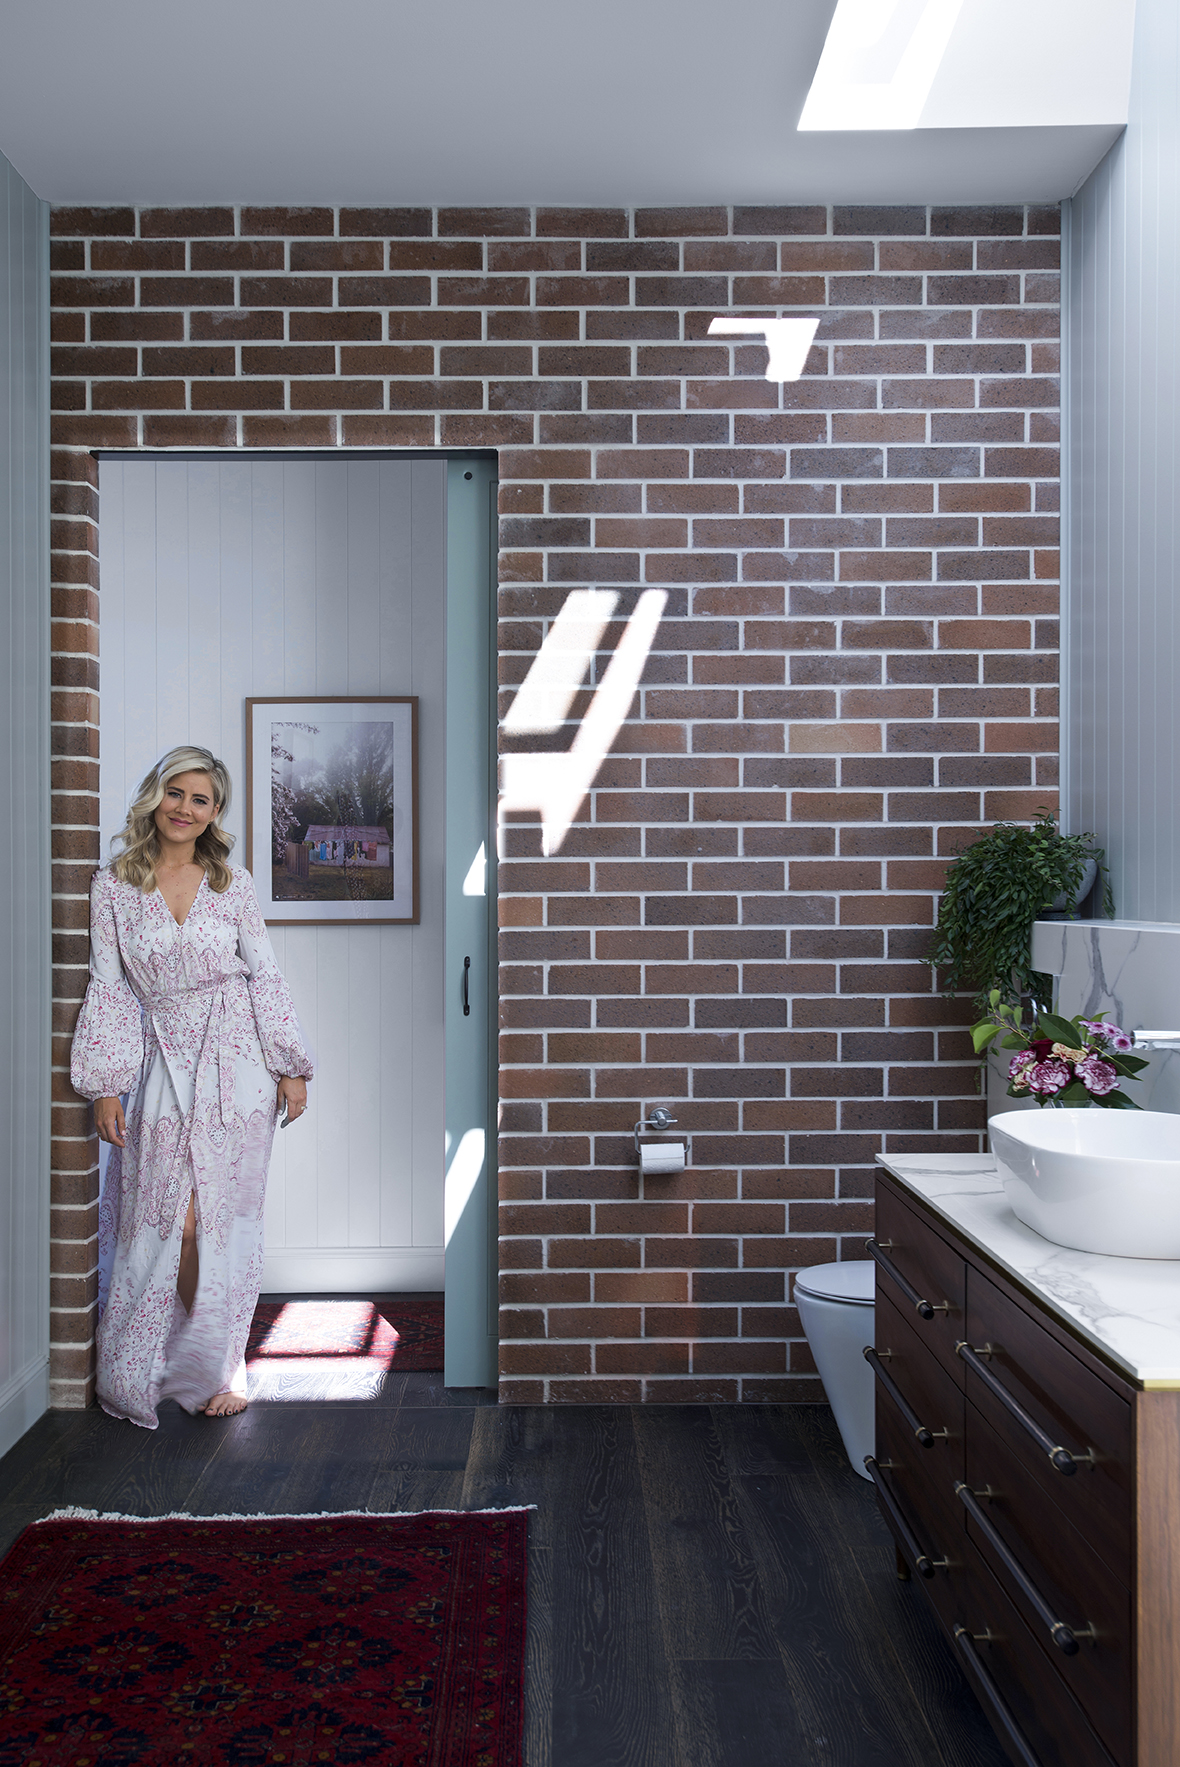
Oh hey, welcome to our main bathroom (the kids and guest bathrooms) and our little piece of modern, meets classic, meets mid-century, meets Europe, meets Australiana, meets the Duffy’s. This room marks the first of our renovation reveal roll out and I love that it’s uniquely ours and reflects the overall intent of the house.
I don’t particularly LOVE making over/renovating bathrooms, as in, they’re not my favourite makeover but I do LOVE this room. Maybe it’s because it doesn’t feel like a bathroom (bath, toilet and basins aside), it feels as inviting as any other room in our renovation.
Michael is always in charge of layout and he has some funny rules about vanities not being butt up against walls and about having all the bathroom product all on the one wall. As I have no strong feeling about that sort if thing, it was my job to make sure this space was jam-packed with character, interest and texture.
Let’s start by addressing the floors. Yes, you see right, we went with hardwood engineered timber floors in our bathroom, which you’re not supposed to typically do and I wouldn’t specify it in a client bathroom but this is OUR bathroom, our first opportunity to do whatever the flip we wanted, considering and despite any risks. The bathrooms are the only rooms in the house in which we floated our floors. Everywhere else they are direct stuck. This means that, god forbid, anything happened we could pull up the floorboards with ease. Stella already gave them a test run by turning on the bath tap without anyone knowing and then walking away, completely forgetting she’d done it but thats a story for another day. The floors are Black Mountain oak timber from Decorug and they are truly fabulous. They are super dark with just enough colour variation in the grain that I don’t see every bit of dust to land on the ground.
All the rugs throughout our house are also from Decorug and they look just so damn good scattered across those dark floors. They’re nearly all handcrafted and naturally dyed and they are almost indestructible, which is exactly what we need in this house. I feel like the rugs somehow tell the story that I want this home to tell, that this is a home with soul.
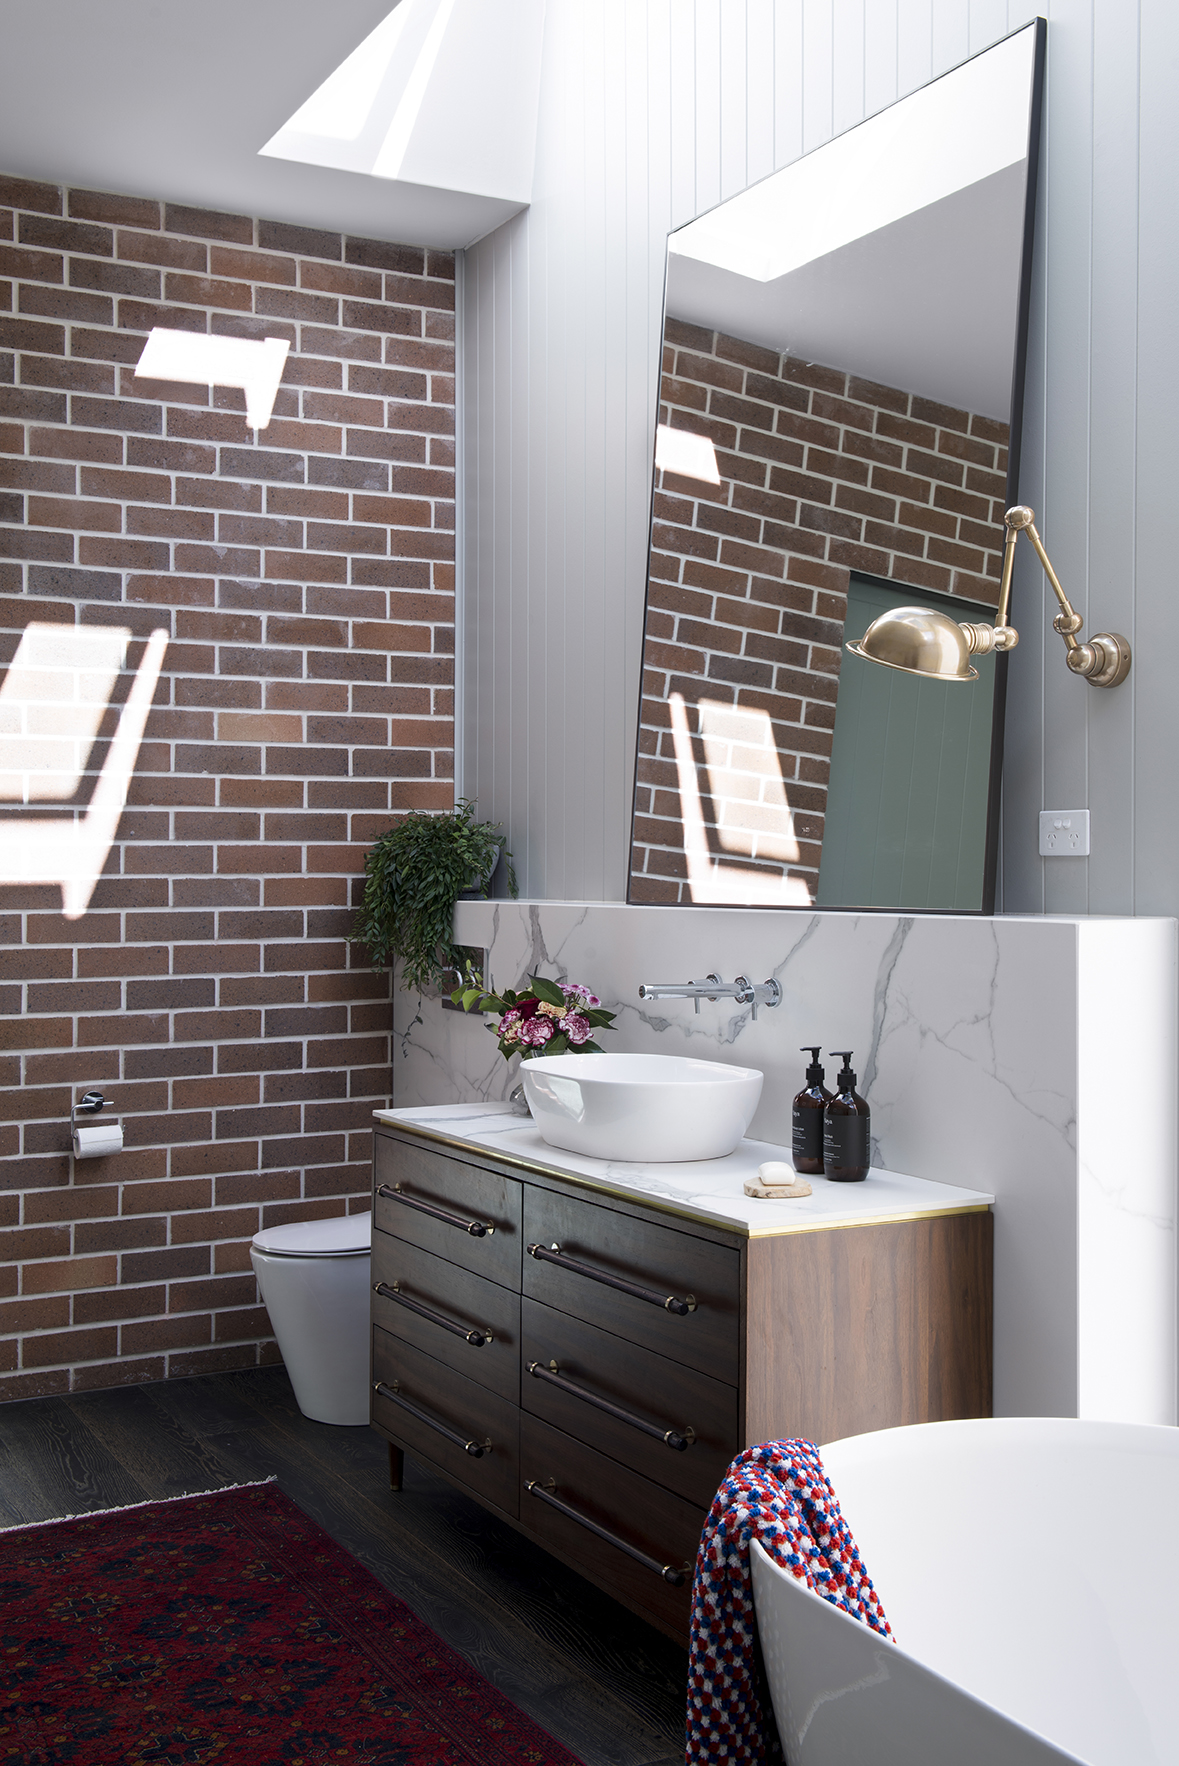
The vanity is in fact a dresser from West Elm which we retro-fit to suit. That meant adjusting the drawers to allow for the plumbing and also shortening the legs. It was a tad too tall.
Everyone asks how our mirror stays there leaning against the wall. It’s siliconed to the wall panelling so it ain’t going anywhere. I had this and the one in our ensuite (stay tuned for that) custom made by my picture framer, should you be thinking of doing the same.
Clearly I didn’t want that powerpoint where it is – something went wrong during rough in. We wanted it in the vanity and the outcome is less than ideal and I do have an image of this powerpoint photoshopped out but I wanted to show you that these things happen to us too. I can cover it with a vase or vessel until someone needs to access it.
On a side note, the plant there has started creeping up the wall, which was not our intent but is very exciting (we’re easily amused).
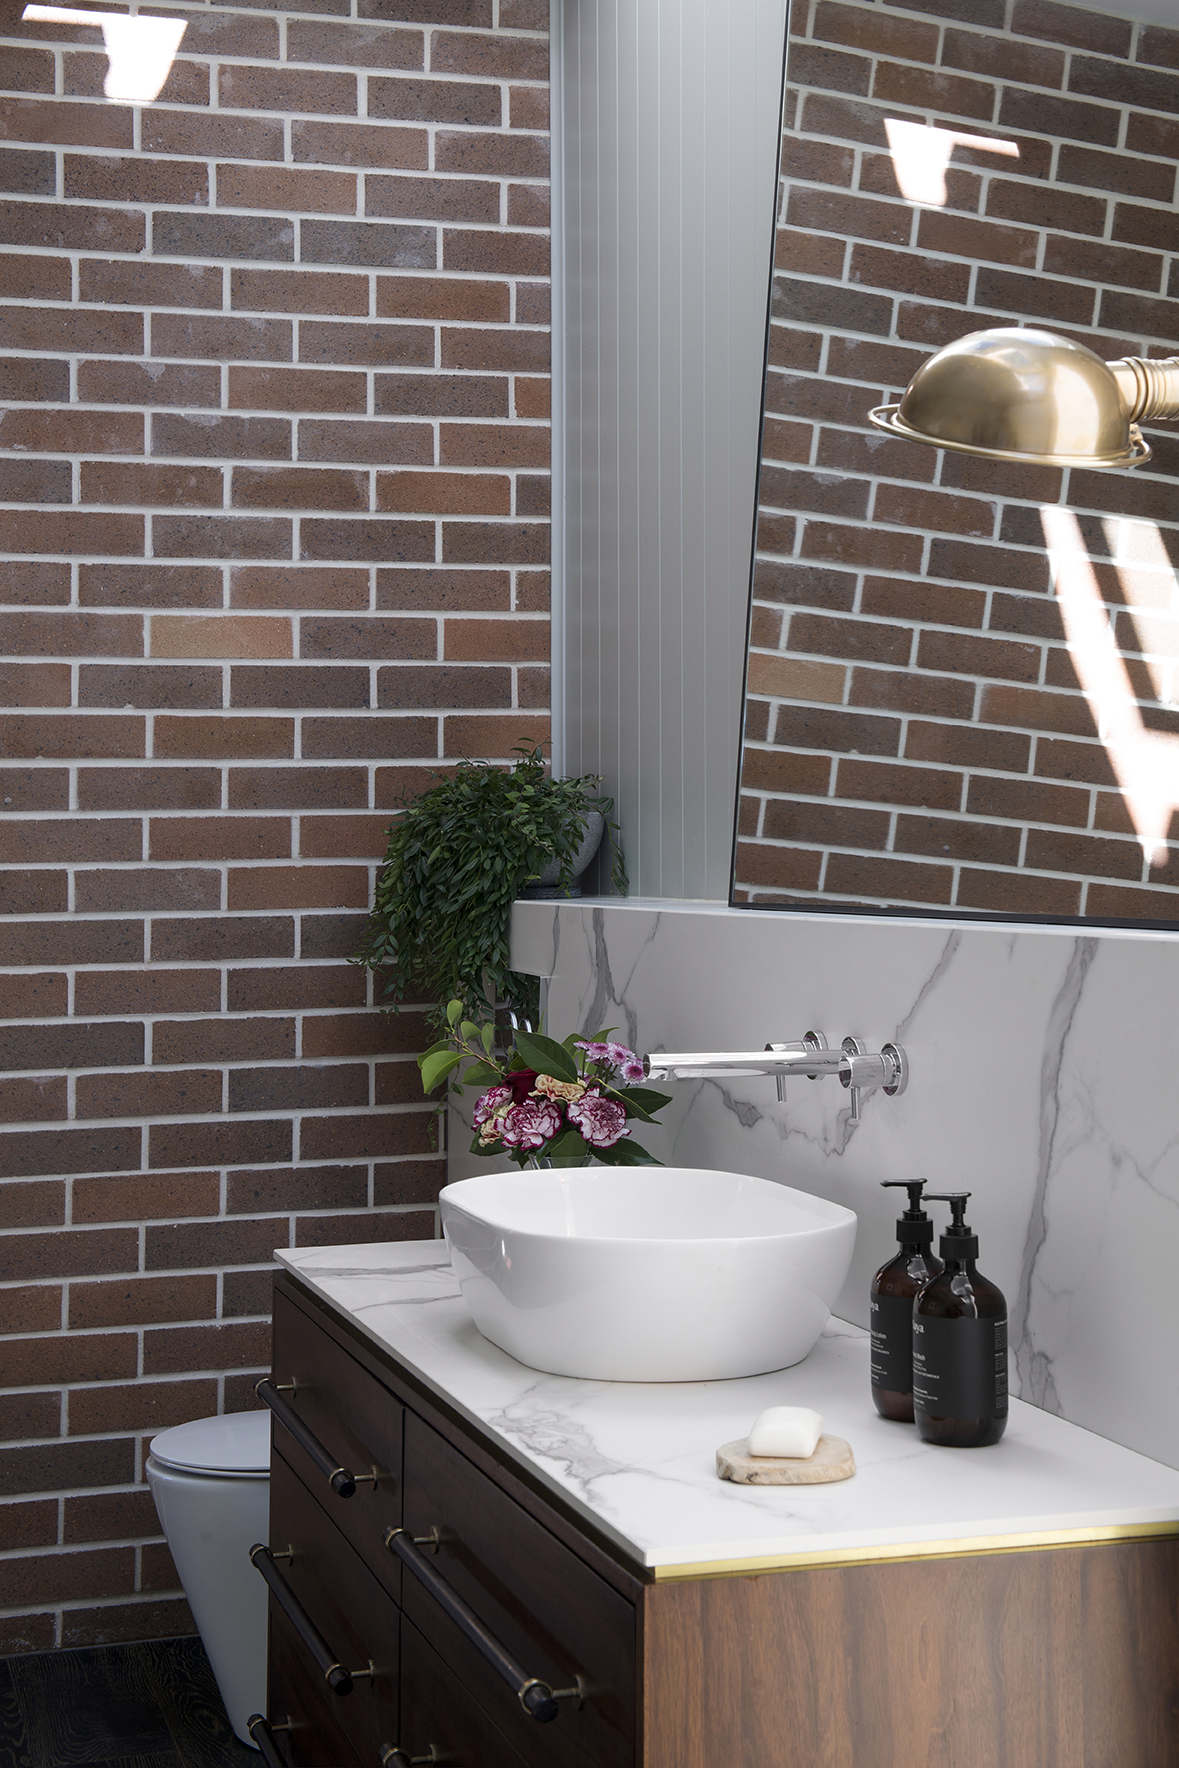
ohhhhh the brick. The brick throughout our home is breathtaking. It makes it’s way down the our entire hallway which means that every room is treated to that rich texture and pattern. We’ve used PGH Bricks’ Hawkesberry Bronze which came to us via ABC Bricks and we paired it with white mortar from the White Cement Company. It’s the white mortar that breathes modern life into this classic brick.
All of our bathroom supplies are from Abey Australia. We’ve used the Betty Lux stone bath, complementing Formosa basin, and the Gareth Ashton Park Avenue toilet. The tap and spout combo are Gareth Ashton Lucia. I’m all about an eclectic interior but I think your bathroom supplies should all be of similar shapes and finishes.
The marble look splashback/ wall and bench are real showstoppers in this space. We’ve used 12mm Quantum Six from Quantum Quartz WK Stone that comes in sheets as big as 3200×1600 and in a range of colours. You can literally line any surface with it (wall, bench, floor). It was installed by the good guys at GMG Stone who did a pretty dang great job at installing it. We went with Statuario from the marble series and by pairing it with the rich timbers and brass accents it’s just so darn elegant.
Speaking of brass, it’s a recurring theme throughout the house. We used brass edging to create a shadow line between the porcelain and the vanity. I’m waiting in anticipation for the brass to age which is the ultimate look I’m aiming for (it’s a little bit gold right now). I even tried using an ageing solution that we sourced online but it’s not quite there yet.

Every non-brick wall in this renovation is clad in Easycraft panels. In the bathrooms we’ve used their Easyclad product which, made up of Australian hardwoods, is for semi-external areas and bathrooms, ideal for it’s non swell characteristics. In every other room, we’ve used EasyVJ panels. They look the same but are made up of different materials. It took Michael a while to understand that I wanted EVERY wall to be VJ panelling. I was adamant and it’s such a good alternative to flat plasterboard. It takes all the work out of the styling phase because there is already so much texture and softness in the space.

Ps, those Saya skin products don’t just look good on my vanity, they are actually a top notch product. Their gel cleanser is the best I’ve ever used.
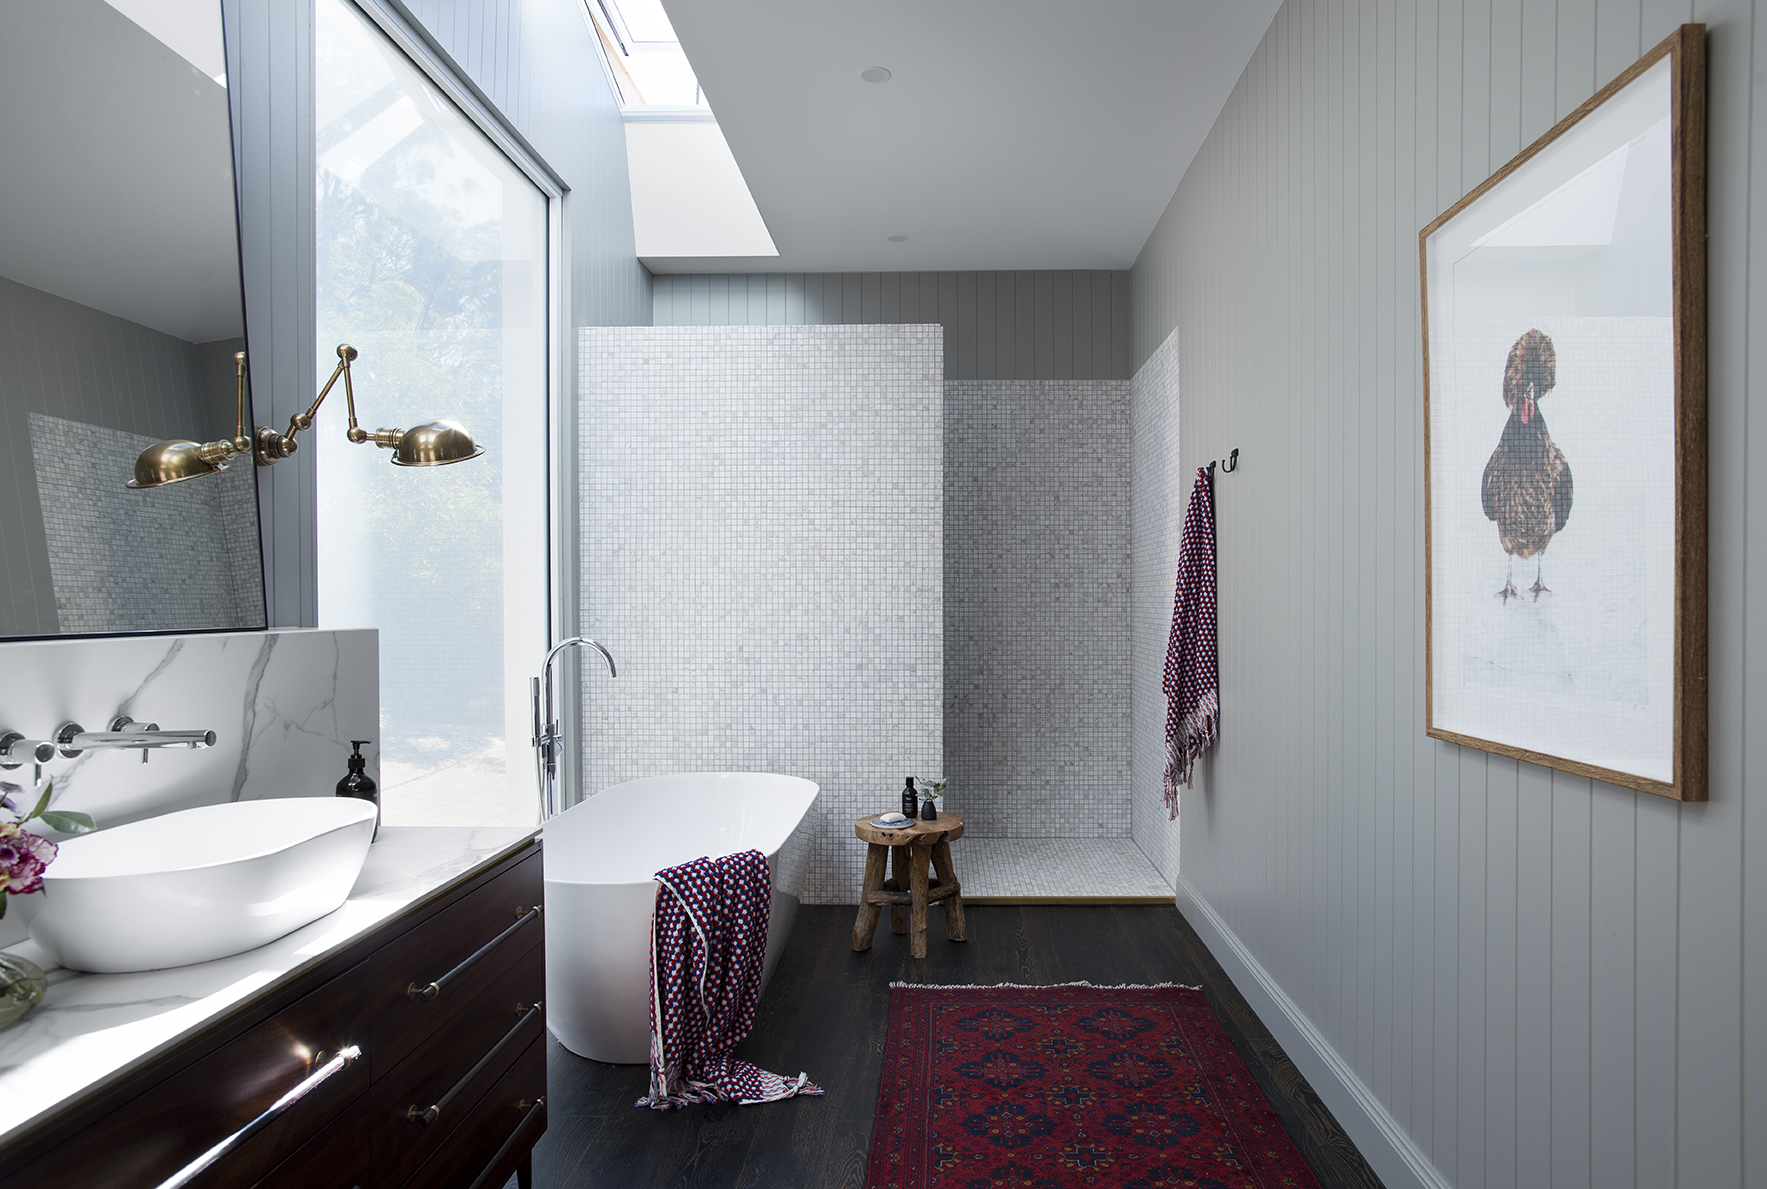
Often when you walk into a space you just get a really good feeling (or not) without being able to put your finger on why. A lot of the time that feeling comes from the amount of natural light in a space. In this room we have two very good sources of it. Michael designed the bank of skylights with our mates at Velux and they do so much for the overall feeling ignited in this space. We can open and close them as we like, controlling them via a remote on the wall. You can also set them on a timer and, now this is really fancy, they are fitted with rain sensors which means we don’t need to run to close them when the weather turns. And look at the shadows it casts into the space! Yum!
Now let’s talk about that super dooper large window. It may just look like a fixed panel glass window to you but it’s waaaaay fancier than that. Its called Switch Glass, it’s from Polytron Glass, and at the flick of a switch the glass transforms from opaque to translucent. You can’t see it in the pics but we’ve planted out a lovely lush green garden which is possibly one of the most luxurious aspects of this bathroom.
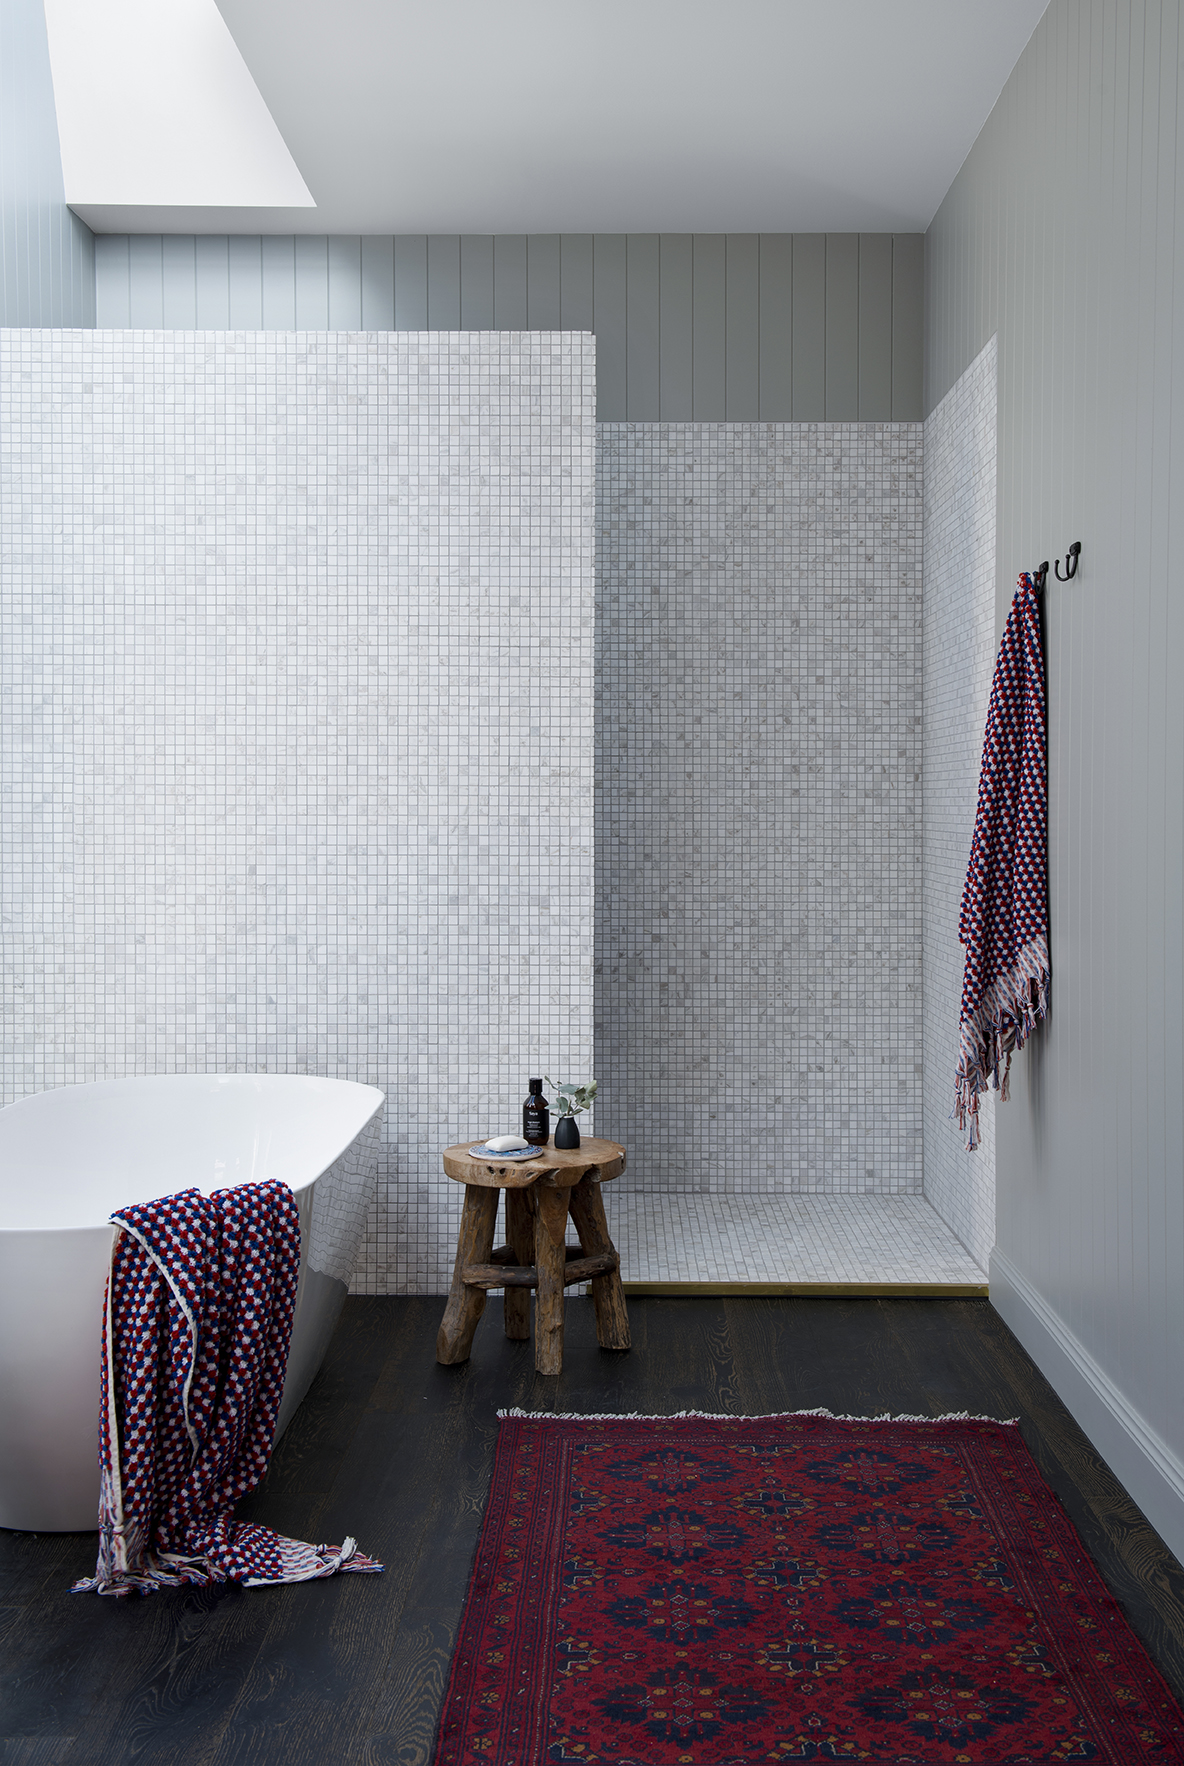
By golly gee, that shower! You can imagine how much my tiler loved me for choosing to tile the whole shower in a marble mosaic. There is no denying it was worth it. The tile is called White Cloud, a Carrara mosaic from National Tiles. I feel that the simple square pattern of the mosaic will stand the test of time, aesthetically and by tiling the whole shower in the one stone this area feels like a room unto itself. It’s incredibly luxurious, almost a little bit grecian and for an added bonus, all of those grout lines make it very slip resistant. I used a light grey grout, pulling out the most dominant colour in the tile.
I’m slightly off topic here but here’s a hot cleaning tip, don’t use bleach to clean your shower. Bleach eats away at the silicone and allows mould to get trapped under the silicone and when that happens you have no choice but to re-silicone. If you have marble surfaces like we do, you have to be careful not to use anything corrosive on it which includes bleach, lemon and vinegar. I specifically didn’t want a glass screen in this space because with all that sunlight it would have shown up every mark. That and the fact that the marble nib wall is sooooo much prettier.
OK, now that you’ve had a lesson in cleaning (boring), what else can I tell you…. that super quirky teak timber stool I picked up from a local antique/vintage retailer a few years ago. You guys, I implore you to scour opp shops, antique stores and markets for furniture and homewares. My favourite items all come from these sources and I treasure them because they’re unique and always very cool.
On another side note, those towels are A-mazing. They’re from Mayde and they are feel so tactile and look sooooo good hanging from my wall. There is also something a bit retro about the weave which I LOVE.

Let’s talk about the door that you see peaking out. We chose the VJ door from from Hume doors Accent range and had it custom made to fit. We purchased the track and bracket from eBay and Bob’s your Uncle. It’s all about that colour though. All our internal doors are painted in Resene Blue Smoke (which doesn’t throw a hint of blue mind you), its just a perfect shade of muted green. The handles are just a super simple black metal from Bunnings. I kept these really fine so as to to their job without stealing focus.
The two pieces of art you can see in this pic are both by Kara Rosenlund, a super cool, total legend, Brisbane photographer whose work lines many a wall in our house. These two pieces I re-purposed from other parts of the house but this is where they’ll stay (the clothesline piece is actually a framed teatowel).
I think that covers it but if not, PLEASE ask questions in the comments section below because no doubt others will have the same. Come back next week for the full Master bedroom reveal. It’s a real beauty.
Images by Mindi Cooke.
November 8, 2017 at 5:49 pm
Beautiful! Maybe the only detail you haven’t mentioned is the framing of the pics. Were they custom made?
November 8, 2017 at 7:04 pm
Ah yes, I use a local framer – Artisan Picture Framing at Varsity Lakes.
November 9, 2017 at 9:33 am
Blown away by the beauty of this room!!
May I ask what paint colour you have used on the VJ panels and on the ceiling in here ?
November 9, 2017 at 10:07 am
Thanks Allison. The walls are Resene Foggy Grey and the ceiling is possibly ceiling white or Black white – can’t recall which.
November 9, 2017 at 11:02 am
Hi Carlene. Your home is beautiful and I like how it is your style with no particular label. We are renovating at present in Perth and are always asked what style, Hamptons, coastal, contemporary. I think it is just anything I like! Which brings me to the easycraft panels. Have always loved the look of them but we have a brick house. The walls are already plastered. Can you direct stick them to walls or do we need to put batons on wall first. Hope that makes sense. Thankyou
November 9, 2017 at 11:07 am
Thanks Helen. I’m a big advocate for making your home whatever you want it to be without having to subscribe to one particular style. Re Easycraft, yes you can hang them over plasterboard which is good news and you can purchase them from Bunnings.
November 9, 2017 at 12:43 pm
Hi Carlene! Loved watching your home come together. Just wondering with your doors – are they hung externally – on the hallway?? If so how did you go about privacy & locking the door from the inside? We’re in the process of putting a barn style door on our laundry/second bathroom & not quite sure what to do .. thanks heaps and I hope there is a second season on Ready Set Reno.
November 9, 2017 at 12:58 pm
Thanks Steph – Yes. We’re thinking of doing a floor bolt – I’ll let you know how we go with it.
November 11, 2017 at 6:17 am
Stunning bathroom, LOVE the green painted door! Can I ask what wall colours did you do the hallway in, is that white? I’m trying to choose a white paint colour and it’s so difficult! Xx
November 11, 2017 at 8:42 pm
Thanks Chelsea. I used Resene “Black White.”
November 14, 2017 at 6:29 am
Congratulations Carlene! Your bathroom looks stunning! Look forward to seeing the rest of your home. Xx
November 14, 2017 at 6:56 am
Thanks Tamra. Hope you and the fam are well. cx
November 19, 2017 at 6:58 am
Hi Carlene, I love the way you have used so many different materials/styles and it works beautifully. I am looking at a big Reno soon. We want to direct stick our oak floors. Did Micheal do this? If not who did your direct stick instal? I am from the Goldcoast. Also, who framed your mirrors?
PS. I love reading your articles for the advice but sense of humor too.
November 19, 2017 at 6:18 pm
Hi Lisa
Thanks for your positive feedback. Michael laid the floors. Anyone can do it as long as they are prepped and patient. Our mirrors were framed by our framer, Artisan Picture Framing at Varsity Lakes. Look out for more room reveals.
January 12, 2020 at 10:54 pm
mpmburg@bigpond.net.au Know this is an old blog Carlene but would love to know please, is the foggy grey full strength ? Love the house!
January 13, 2020 at 11:27 am
It’s quarter strength. Great colour!